tngk tajuk pun dh borink kan? admin mmg bz so tak dpt lha nak upload pic graphics2 bru sbb dh start keje part time kat KRR Amcorp Mall...KRR apa bende tu? KRR tu Kenny Rogers Roasters...admin keje bahagian belakang je...basuh pinggan,siapkan ayam,panggang ayam,kupas bawang,kentang..arghh macam2 ar...tpikan admin mmg tak suka kejer bahagian depan..mcm ambik order tu...sbb malas nak speaking...tpi yg sedieh keje kat situ..semalam hari terakhir MISS TINI..manager kitaorang...die tu mmg lha tak cantik tpi die garang!...tpi garang2 pun boleh buat kawan whahah.....MISS Tini...kami akan rindu miss...


Sukan Sea(BolaSepak)(Kumpulan)
|
Keputusan undian kumpulan bolasepak Sukan SEA 2011:
Kumpulan A:
MALAYSIA
INDONESIA
SINGAPURA
THAILAND
KEMBOJA
INDONESIA
SINGAPURA
THAILAND
KEMBOJA
Kumpulan B:
VIETNAM
LAOS
BRUNEI DARUSSALAM
TIMOR LESTE
MYANMAR
FILIPINA
LAOS
BRUNEI DARUSSALAM
TIMOR LESTE
MYANMAR
FILIPINA
amacam peminat Malaysia...syok...tngk smpai kita je lawan susah2 ...nampak tak mcm dorng sengaja je nak dajal kita...
Pig Fat
|
Why PIG FAT is not mentioned but CODE(S) are printed? (WHY E-CODES ARE DEVELOPED)
Forwarding as received, read and shared with your students...
PIG FAT By Dr. M. Amjad Khan
In nearly all the western countries including Europe, the PRIMARY choice for meat is PIG. There are a lot of farms in these countries to breed this animal. In France alone, there are more than 42,000 Pig Farms.
PIGS have the highest quantity of FAT in their body than any other animal.
Europeans and Americans try to avoid fats. Thus, where does the FAT from these PIGS go?
All pigs are cut in slaughter houses under the control of the department of food and it was the headache of the department of food to dispose of the fat removed from these pigs.
About 60 years ago, these fats were burnt. Then they thought of utilizing it. First, they experimented it in the making of SOAPS and it worked.
Then, a full network was formed and this FAT was chemically Processed, Packed and Marketed, while other manufacturing companies bought it.
In the meantime, all European States made it a rule that every Food, Medical and Personal Hygiene product should have the ingredients listed on its cover. so, this ingredient was listed as PIG FAT.
Those who are living in Europe for the past 40 years know about this. But, these products came under a ban by the ISLAMIC COUNTRIES at that time, which resulted in a trade deficit.
Going back in time, if you are somehow related to South East Asia, you might know about the provoking factors of the 1857 CIVIL WAR. At that time, Rifle Bullets were made in Europe and transported to the sub-continent through the Sea. It took months to reach there and the gun powder in it was ruined due to the exposure to sea.
Then, they got the idea of coating the Bullets with fat, which was PIG FAT. The fat layer had to be scratched by teeth before using them. When the word spread, the soldiers, mostly Muslim and some Vegetarians, refused to fight. Which eventually lead to the Civil War.
The Europeans recognized these facts, and instead of writing PIG FAT, they started writing ANIMAL FAT. All those living in Europe since 1970s know this fact. When the companies were asked by authorities from the MUSLIM COUNTRIES, what animal fat is it, they were told it was COW and SHEEP Fat.
Here again a question raised, if it was COW or SHEEP Fat, still it is HARAAM to MUSLIMS, as these animal were not SLAUGHTERED as per the ISLAMIC LAW. Thus, they were again banned.
Now, these multinational companies were again facing a severe drought of money as 75% of their income comes from selling their goods to Muslim Countries, and these earn BILLIONS OF DOLLARS of Profit from their exports to the MUSLIM WORLD.
Finally they decided to start a coding language, so that only their Departments of Food Administration should know what they are using, and the common man is left in the dark. Thus, they started E-CODES. These E-INGREDIENTS are present in a majority of products of multinational firms including, but not limited to
TOOTH PASTE, SHAVING CREAM CHEWING GUM, CHOCOLATE, SWEETS, BISCUITS, CORN FLAKES, TOFFEES, CANNED FOODS & FRUITS, SOME MEDICATIONS & MULTI-VITAMINS
Since these goods are being used in all MUSLIM Countries indiscriminately, our society is facing problems like shamelessness, rudeness and sexual promiscuity.
So, I request all MUSLIMS or non pork eaters to check the ingredients of the ITEMS of daily use and match it with the following list of E-CODES.
If any products has been listed with these codes please do not buy them since the source of fat is PIG FAT. Therefore, it is good if every Muslims are to remember these codes (and beat those unscrupulous capitalist at their own game).!
E100, E110, E120, E140,
E141 E153, E210, E213,
E214, E216, E234, E252, E270 E280 E325, E326,
E327 E334 E335, E336
E337 E422, E430, E431,
E432, E433, E434, E435,
E436, E440, E470, E471,
E472, E473, E474, E475,
E476, E477, E478, E481,
E482, E483, E491, E492,
E493, E494, E495, E542,
E570, E572, E631, E635,
E904.
Dr.M.Amjad Khan
Medical Research Institute
United States
http://al-ahkam.net/home/index.php?option=com_content&view=article&id=4927:kod-lemak-babi&catid=48:berita-dan-isu
Kod Lemak Babi
|
PPIM SERINGKALI DIHUJANI DENGAN EMEL DARIPADA PENGGUNA YANG MINTA KESAHIHAN EMEL ‘FORWARD’ BERKENAAN PRODUK DAN RESTORAN-RESTORAN DI MALAYSIA. BERIKUT ADALAH KOMEN DARIPADA JABATAN PENYELIDIKAN PPIM. DISIARKAN JUGA ARTIKEL DARIPADA DR. M. AMJAD KHAN YANG BERTAJUK Why PIG FAT is not mentioned but CODE(S) are printed? (WHY E-CODES ARE DEVELOPED) untuk bacaan anda.
Assalamualaikum wrt wbt, saudara-saudara dan sahabat-sahabat sekelian, Di bawah ini, kami siarkan jawapan yang diperolehi daripada LAMAN WEB JAKIM mengenai status halal haram produk dan syarikat-syarikat yang terbabit. Mungkin senarai ini boleh menjadi panduan kasar untuk kita memilih samada untuk terus mengguna / menyokong atau memboikot syarikat-syarikat tersebut. Namun begitu, pada pendapat kami, tanggungjawab mencari yang halal itu adalah terletak ke atas bahu kita sendiri (wajib).
Bahkan kita patut sentiasa berwaspada terhadap apa-apa makanan atau minuman yang dihulurkan kepada kita termasuklah mengetahui apakah sebenarnya status ramuan yang dilabelkan di bawah Pelabelan Kod E.
Kita hendaklah sedar bahawa sebenarnya tujuan pihak kapitalis merancang Pelabelan Ramuan Makanan di bawah Sistem Kod pada sekitar tahun 1800 an adalah sebahagian utamanya untuk mengelirukan Pengguna - khasnya Pengguna Islam. (Sila rujuk kepada pendapat Dr. M Amjad Khan di dalam artikel beliau “Kenapa perkataan “Babi” tidak di label dan diganti dengan Kod E”). Apatah lagi terlalu banyak penambah makanan / komponen yang dikeluarkan dari hari ke hari, dengan pengunaan kaedah bercampur aduk yang sangat meragukan.
Hanya pihak pengeluar ramuan sahaja yang benar-benar mengetahui apakah komponen ramuan yang dicipta. Kita juga patut sedar bahawa 80% pihak kapitalis adalah orang kafir dan kebanyakan mereka merupakan manusia yang tamak dan haloba.
Oleh yang demikian, cara yang paling berkesan untuk membalas perbuatan tidak bertanggungjawab mereka ialah JANGAN membeli / memakan barang-barang yang meragukan. Kita mesti bersatu, memboikot dan membeli hanya daripada pengusaha-pengusaha Islam sahaja. Kita jangan terbawa-bawa dengan slogan “Malaysia Negara Islam” atau “Malaysia is a Halal Hub”.
Berhati-hatilah membuat pilihan kerana kita adalah apa yang kita makan. Berikut adalah senarai hangat yang diperolehi daripada laman web JAKIM dan telah tersebar luas melalui emel-emel anda.
1. Restoran berikut telah mendapat pengesahan halal JAKIM :
1) McDonald
2) A&W
3) Secret Recipe
Restoran / syarikat berikut telah ditarik sijil pengesahan halal JAKIM
kerana gagal mematuhi syarat dan piawaian halal :
1) Victoria Station
2) Kam Lun Tai
3) Lotus Family Restoran
Restoran / syarikat berikut tidak pernah mendapat pengesahan halal JAKIM :
1) San Francisco Steakhouse
2) Chicken Rice shop
3) Kiwi Express
Bagi minuman ringan keluaran syarikat F&N seperti coke dan 100 plus telah
mendapat pengesahan halal JAKIM.
Bagi kuih bulan dan kuih bakul yang telah mendapat pengesahan halal JAKIM
adalah halal sebagai contoh yang dikeluarkan oleh syarikat.
KG Pastry atau Norainis Cookies dan lain-lain yang ada menggunakan logo halal JAKIM.Kam Lun Tai kuih bulan daripada syarikat ini telah ditarikbalik
pengesahan halalnya disebabkan berlaku perlanggaran syarat dan peraturan
halal yang ditetapkan.
2. Farmbest : Ayam segar yang dibungkuskan atas nama Farmbest adalah dikeluarkan oleh Syarikat Sin Mah S/B, syarikat ini telah mendapat pengesahan halal JAKIM.
3. Supplement : Sehingga kini pengeluar supplement dan produk makanan kesihatan yang telah berdaftar dengan JAKIM adalah syarikat Upha, kebanyakan supplement food dari syarikat Upha telah mendapat pengesahan halal JAKIM dan telah dipastikan soft gel untuk kapsul yang digunakan adalah halal. Bagi produk jenama Blackmores, Solaray,Seven Seas, 21 Century tidak pernah mendapat pengesahan halal JAKIM, kerana itu tidak dapat dipastikan kapsul yang digunakan itu walau pun didakwa bersumberkan lembu tetapi tidak diketahui sama ada lembu itu disembelih atau tidak. Produk yang tidak mendapat pengesahan halal ini adalah kerana itu adalah produk import, maka pengedar dan pengeluar bertanggungjawab mendapatkan pengesahan halal dari badan islam dinegara asal produk tersebut diimport.
4. Café : Untuk makluman Coffee Bean telah mendapat pengesahan halal JAKIM maka coffee bean tidak berkaitan dengan email yang disebarkan ini tetapi Starbuck tidak pernah mendapat pengesahan halal JAKIM maka tidak dapat dipastikan status kehalalan makanan/minuman yang disediakan.
5. Restoran Dome dan seluruh rangkaiannya tidak pernah mendapat pengesahan halal JAKIM, maka kerana itu tidak dapat dipastikan status kehalalan makanan/minuman yang disediakan di restoran ini.
6. Gerai-Gerai makan Semua Medan Selera di KLCC tidak ada yang mendapat pengesahan halal JAKIM 7. Confectionery Bakers Cottage telah mendapat pengesahan halal dari JAIS ( Jabatan Agama Islam Selangor ), La Boheme tidak dapat dipastikan status halal kerana tidak pernah mendapat pengesahan halal JAKIM.
Kings Confectionery telah mendapat pengesahan halal JAKIM, Giant dan Tesco - Status makanan yang disediakan ada sebahagiannya yang telah mendapat pengesahan halal JAKIM, manakala Jusco hendaklah merujuk kepada logo halal yang digunakan pada pembungkusan produk keranaJusco tidak pernah mendapat pengesahan halal JAKIM secara khusus.
Bread Talk & Bread Story tidak pernah mendapat pengesahan halal JAKIM.
8. Restoran Burger King - Sehingga kini JAKIM tidak pernah memberi pengesahan halal ke atas Restoran Burger King, maka dengan itu tidak dapat dipastikan status kehalalan produk yang dijual.
9. Sosej ayam - Pernyataan mencampurkan minyak babi untuk pembuatan sausage ayam, fish ball dan lain-lain adalah tidak benar bagi produk yang telah mendapat pengesahan halal JAKIM. Bagi produk Ramli Burger dan Ayamas, memang telah mendapat pengesahan halal JAKIM dan kedua-dua syarikat ini sentiasa mematuhi peraturan halal JAKIM.
10.Berkenaan Mewarnakan rambut : dari segi hukum syarak terbagi kepada
1) Harus mewarnakan rambut dengan warna selain hitam. Warna hitam hanya harus bagi yang berpenyakit sahaja.
2) Makruh mewarnakan rambut bagi orang muda 3) Haram mewarnakan rambut bagi orang yang terlalu tua.
4) Haram mewarnakan rambut tanpa tujuan.
5) Harus mewarnakan rambut dengan izin Suami.
Dari segi ingredient / ramuan pewarna rambut yg ada dipasaran terbahagi kepada 2 jenis yang mana, kedua-duanya adalah halal dari segi bahan kandungan. Yang menjadi persoalan adakah pewarna tersebut menyerap air atau tidak ??
Pewarna rambut yang dipasaran biasanya akan tertulis pada kotak PERMANENT DYE atau SEMI PERMANENT DYE. Mengikut kajian jenis yang Semi-Pamenent Dye adalah jenis yang tidak menyerap air dan ianya tidak boleh dipakai oleh orang islam. Begitu juga sebaliknya.
JAKIM sendiri tidak pernah mengeluarkan sijil halal untuk produk pewarna rambut kerana ianya di kilangkan di luar negara. Utk pengetahuan, JAKIM hanya akan keluarkan sijil halal utk produk yang diproses di Malaysia sahaja .
Waallahualam
http://al-ahkam.net/home/index.php?option=com_content&view=article&id=4927:kod-lemak-babi&catid=48:berita-dan-isuOleh yang demikian, cara yang paling berkesan untuk membalas perbuatan tidak bertanggungjawab mereka ialah JANGAN membeli / memakan barang-barang yang meragukan. Kita mesti bersatu, memboikot dan membeli hanya daripada pengusaha-pengusaha Islam sahaja. Kita jangan terbawa-bawa dengan slogan “Malaysia Negara Islam” atau “Malaysia is a Halal Hub”.
Berhati-hatilah membuat pilihan kerana kita adalah apa yang kita makan. Berikut adalah senarai hangat yang diperolehi daripada laman web JAKIM dan telah tersebar luas melalui emel-emel anda.
1. Restoran berikut telah mendapat pengesahan halal JAKIM :
1) McDonald
2) A&W
3) Secret Recipe
Restoran / syarikat berikut telah ditarik sijil pengesahan halal JAKIM
kerana gagal mematuhi syarat dan piawaian halal :
1) Victoria Station
2) Kam Lun Tai
3) Lotus Family Restoran
Restoran / syarikat berikut tidak pernah mendapat pengesahan halal JAKIM :
1) San Francisco Steakhouse
2) Chicken Rice shop
3) Kiwi Express
Bagi minuman ringan keluaran syarikat F&N seperti coke dan 100 plus telah
mendapat pengesahan halal JAKIM.
Bagi kuih bulan dan kuih bakul yang telah mendapat pengesahan halal JAKIM
adalah halal sebagai contoh yang dikeluarkan oleh syarikat.
KG Pastry atau Norainis Cookies dan lain-lain yang ada menggunakan logo halal JAKIM.Kam Lun Tai kuih bulan daripada syarikat ini telah ditarikbalik
pengesahan halalnya disebabkan berlaku perlanggaran syarat dan peraturan
halal yang ditetapkan.
2. Farmbest : Ayam segar yang dibungkuskan atas nama Farmbest adalah dikeluarkan oleh Syarikat Sin Mah S/B, syarikat ini telah mendapat pengesahan halal JAKIM.
3. Supplement : Sehingga kini pengeluar supplement dan produk makanan kesihatan yang telah berdaftar dengan JAKIM adalah syarikat Upha, kebanyakan supplement food dari syarikat Upha telah mendapat pengesahan halal JAKIM dan telah dipastikan soft gel untuk kapsul yang digunakan adalah halal. Bagi produk jenama Blackmores, Solaray,Seven Seas, 21 Century tidak pernah mendapat pengesahan halal JAKIM, kerana itu tidak dapat dipastikan kapsul yang digunakan itu walau pun didakwa bersumberkan lembu tetapi tidak diketahui sama ada lembu itu disembelih atau tidak. Produk yang tidak mendapat pengesahan halal ini adalah kerana itu adalah produk import, maka pengedar dan pengeluar bertanggungjawab mendapatkan pengesahan halal dari badan islam dinegara asal produk tersebut diimport.
4. Café : Untuk makluman Coffee Bean telah mendapat pengesahan halal JAKIM maka coffee bean tidak berkaitan dengan email yang disebarkan ini tetapi Starbuck tidak pernah mendapat pengesahan halal JAKIM maka tidak dapat dipastikan status kehalalan makanan/minuman yang disediakan.
5. Restoran Dome dan seluruh rangkaiannya tidak pernah mendapat pengesahan halal JAKIM, maka kerana itu tidak dapat dipastikan status kehalalan makanan/minuman yang disediakan di restoran ini.
6. Gerai-Gerai makan Semua Medan Selera di KLCC tidak ada yang mendapat pengesahan halal JAKIM 7. Confectionery Bakers Cottage telah mendapat pengesahan halal dari JAIS ( Jabatan Agama Islam Selangor ), La Boheme tidak dapat dipastikan status halal kerana tidak pernah mendapat pengesahan halal JAKIM.
Kings Confectionery telah mendapat pengesahan halal JAKIM, Giant dan Tesco - Status makanan yang disediakan ada sebahagiannya yang telah mendapat pengesahan halal JAKIM, manakala Jusco hendaklah merujuk kepada logo halal yang digunakan pada pembungkusan produk keranaJusco tidak pernah mendapat pengesahan halal JAKIM secara khusus.
Bread Talk & Bread Story tidak pernah mendapat pengesahan halal JAKIM.
8. Restoran Burger King - Sehingga kini JAKIM tidak pernah memberi pengesahan halal ke atas Restoran Burger King, maka dengan itu tidak dapat dipastikan status kehalalan produk yang dijual.
9. Sosej ayam - Pernyataan mencampurkan minyak babi untuk pembuatan sausage ayam, fish ball dan lain-lain adalah tidak benar bagi produk yang telah mendapat pengesahan halal JAKIM. Bagi produk Ramli Burger dan Ayamas, memang telah mendapat pengesahan halal JAKIM dan kedua-dua syarikat ini sentiasa mematuhi peraturan halal JAKIM.
10.Berkenaan Mewarnakan rambut : dari segi hukum syarak terbagi kepada
1) Harus mewarnakan rambut dengan warna selain hitam. Warna hitam hanya harus bagi yang berpenyakit sahaja.
2) Makruh mewarnakan rambut bagi orang muda 3) Haram mewarnakan rambut bagi orang yang terlalu tua.
4) Haram mewarnakan rambut tanpa tujuan.
5) Harus mewarnakan rambut dengan izin Suami.
Dari segi ingredient / ramuan pewarna rambut yg ada dipasaran terbahagi kepada 2 jenis yang mana, kedua-duanya adalah halal dari segi bahan kandungan. Yang menjadi persoalan adakah pewarna tersebut menyerap air atau tidak ??
Pewarna rambut yang dipasaran biasanya akan tertulis pada kotak PERMANENT DYE atau SEMI PERMANENT DYE. Mengikut kajian jenis yang Semi-Pamenent Dye adalah jenis yang tidak menyerap air dan ianya tidak boleh dipakai oleh orang islam. Begitu juga sebaliknya.
JAKIM sendiri tidak pernah mengeluarkan sijil halal untuk produk pewarna rambut kerana ianya di kilangkan di luar negara. Utk pengetahuan, JAKIM hanya akan keluarkan sijil halal utk produk yang diproses di Malaysia sahaja .
Waallahualam
Idola~ Goal Keeper
|
...idola admin~
1.David De Gea(Manchester United)
2. Khairul Fahmi Che Mat (Kelantan Fc,Malaysia Football Team)
1.David De Gea(Manchester United)
 |
| \\David De Gea // |
 |
| Khairul Fahmi Che Mat |
Program Lepas Pmr
|
....lepas je abis pmr sekolah dh sediakan jadual lepas pmr....arghh programnya sungguh memboringkan..mcm aktiviti memasak,bijak sifir, lawatan ke logos ship~...arghh boring..nak ponteng tak boleh sbb kedatangan diambil....arghhh kene tunggu 19.10 bru ada program best Liga 1 Murid 1 Sukan~ arghhh tangan tak sabar nak menepis bola~ whaha...ai maklum lha penjaga goal a.k.a Goal Keeper...
 |
| Sumber :Google Images |
Grafiks
|
Apa Itu grafik:
grafik adalah karangan visual yang memberi katerangan atau mesej dalam komunikasi.
Ciri-ciri penting penyediaan grafik:
Objektif:
- perancangan teliti - kemudahan alat atau bahan - saiz bahan atau alat yang digunakan - rekabentuk visual - susuatur - penghurufan
Elemen-elemen grafik:
- garisan - penekanan - bentuk - kasan khas dan minat - ruang - kesan yang baik dan tidak terlalu padat - tetalan - sebagai warna dan hiasan - warna - membayangkan perasaan, daya tarikan, simbolik dan menyampaikan perasaan
Prinsip-prinsip grafik:
- penyatuan - bentuk mudah - penekanan - imbangan
Peralatan:
- komputer - pensil - graphite atau lead - pen - teknikal, isograf - dakwat - India atau China - marker, pembaris - papan lukisan, set Bofa - kertas, pisau, pemandam, gam - penghurufan - mekanikal atau teknik
Dosa Mengumpat
|
Mengumpat ialah menceritakan atau menyebut
keburukan atau kekurangan seseorang kepada orang lain.
Rasullah S.A. W. menjelaskan mengenai mengumpat seperti sabdanya bermaksud
"Mengumpat itu ialah apabila kamu menyebut perihal saudaramu dengan sesuatu
perkara yang dibencinya"(Hadis Riwayat Muslim)
Mengumpat berlaku sama ada disedari atau tidak. Perbuatan itu termasuk
apabila menyebut atau menceritakan keburukan biarpun tanpa menyebut nama
pelakunya tetapi diketahui oleh orang yang mendengarnya.
Memandangkan betapa buruk dan hinanya mengumpat, ianya disamakan seperti
memakan daging saudara seagama. Manusia waras tidak sanggup memakan daging
manusia, inikan pula daging saudara sendiri.
Dosa mengumpat bukan saja besar, malah antara dosa yang tidak akan
diampunkan oleh Allah biarpun pelakunya benar-benar bertaubat.
Dosa mengumpat hanya layak diampunkan oleh orang yang diumpatkan. Selagi
orang yang diumpatnya tidak mengampunkan, maka dosa itu akan kekal dan
menerima pembalasannya diakhirat.
Sabda Rasulullah S.A.W. bermaksud: "Awaslah daripada mengumpat kerana
mengumpat itu lebih berdosa daripada zina. Sesungguhnya orang melakukan
zina, apabila dia bertaubat, Allah akan menerima taubatnya. Dan
sesungguhnya orang yang melakukan umpat tidak akan diampunkan dosanya
sebelum diampun oleh orang yang diumpat" (Hadis riwayat Ibnu Abib Dunya dan
Ibnu Hibbad)
Disebabkan mengumpat terlalu biasa dilakukan, maka ia tidak dirasakan lagi
sebagai satu perbuatan dosa. Hakikat inilah perlu direnungkan oleh semua.
Mengumpat dan mencari kesalahan orang lain akan mendedahkan diri pelakunya
diperlakukan perkara yang sama oleh orang lain. Allah akan membalas
perbuatan itu dengan mendedahkan keburukan pada dirinya. Sabda Rasulullah
S.A.W. "Wahai orang yang beriman dengan lidahnya tetapi belum beriman
dengan hatinya! Janganlah kamu mengumpat kaum muslim, dan janganlah kamu
mengintip-intip keaibannya. Sesungguhnya, sesiapa yang mengintip keaiban
saudaranya, maka Allah akan mengintip keaibannya, dan dia akan
mendedahkannya, meskipun dia berada dalam rumahnya sendiri" (Hadis riwayat
Abu Daud)
Orang yang mengumpat akan mendapat kerugian besar pada hari akhirat. Pada
rekod amalan mereka akan dicatatkan sebagai perbuatan menghapuskan pahala.
Sabda Rasulullah S.A.W. bermaksud : "Perbuatan mengumpat itu samalah
seperti api memakan ranting kayu kering". Pahala yang dikumpulkan sebelum
itu akan musnah atau dihapuskan seperti mudahnya api memakan kayu kering
sehingga tidak tinggal apa-apa lagi.
Diriwayatkan oleh Abu Ummah al-Bahili, di akhirat seorang terkejut besar
apabila melihat cacatan amalan kebaikan yang tidak pernah dilakukannya
didunia. Maka, dia berkata kepada Allah "Wahai Tuhan ku, dari manakah
datangnya kebaikan yang banyak ini, sedangkan aku tidak pernah
melakukannya". Maka Allah menjawab : "Semua itu kebaikan (pahala) orang
yang mengumpat engkau tanpa engkau ketahui".
Sebaliknya, jika pahala orang yang mengumpat tidak ada lagi untuk diberikan
kepada orang yang diumpat, maka dosa orang yang diumpat akan dipindahkan
kepada orang yang mengumpat. Inilah dikatakan orang muflis diakhirat nanti.
Memandangkan betapa buruknya sifat mengumpat, kita wajib berusaha
mengelakkan diri daripada melakukannya.
Oleh itu perbanyakkanlah zikir supaya dapat menghindarkan diri daripada
mengumpat.
keburukan atau kekurangan seseorang kepada orang lain.
Rasullah S.A. W. menjelaskan mengenai mengumpat seperti sabdanya bermaksud
"Mengumpat itu ialah apabila kamu menyebut perihal saudaramu dengan sesuatu
perkara yang dibencinya"(Hadis Riwayat Muslim)
Mengumpat berlaku sama ada disedari atau tidak. Perbuatan itu termasuk
apabila menyebut atau menceritakan keburukan biarpun tanpa menyebut nama
pelakunya tetapi diketahui oleh orang yang mendengarnya.
Memandangkan betapa buruk dan hinanya mengumpat, ianya disamakan seperti
memakan daging saudara seagama. Manusia waras tidak sanggup memakan daging
manusia, inikan pula daging saudara sendiri.
Dosa mengumpat bukan saja besar, malah antara dosa yang tidak akan
diampunkan oleh Allah biarpun pelakunya benar-benar bertaubat.
Dosa mengumpat hanya layak diampunkan oleh orang yang diumpatkan. Selagi
orang yang diumpatnya tidak mengampunkan, maka dosa itu akan kekal dan
menerima pembalasannya diakhirat.
Sabda Rasulullah S.A.W. bermaksud: "Awaslah daripada mengumpat kerana
mengumpat itu lebih berdosa daripada zina. Sesungguhnya orang melakukan
zina, apabila dia bertaubat, Allah akan menerima taubatnya. Dan
sesungguhnya orang yang melakukan umpat tidak akan diampunkan dosanya
sebelum diampun oleh orang yang diumpat" (Hadis riwayat Ibnu Abib Dunya dan
Ibnu Hibbad)
Disebabkan mengumpat terlalu biasa dilakukan, maka ia tidak dirasakan lagi
sebagai satu perbuatan dosa. Hakikat inilah perlu direnungkan oleh semua.
Mengumpat dan mencari kesalahan orang lain akan mendedahkan diri pelakunya
diperlakukan perkara yang sama oleh orang lain. Allah akan membalas
perbuatan itu dengan mendedahkan keburukan pada dirinya. Sabda Rasulullah
S.A.W. "Wahai orang yang beriman dengan lidahnya tetapi belum beriman
dengan hatinya! Janganlah kamu mengumpat kaum muslim, dan janganlah kamu
mengintip-intip keaibannya. Sesungguhnya, sesiapa yang mengintip keaiban
saudaranya, maka Allah akan mengintip keaibannya, dan dia akan
mendedahkannya, meskipun dia berada dalam rumahnya sendiri" (Hadis riwayat
Abu Daud)
Orang yang mengumpat akan mendapat kerugian besar pada hari akhirat. Pada
rekod amalan mereka akan dicatatkan sebagai perbuatan menghapuskan pahala.
Sabda Rasulullah S.A.W. bermaksud : "Perbuatan mengumpat itu samalah
seperti api memakan ranting kayu kering". Pahala yang dikumpulkan sebelum
itu akan musnah atau dihapuskan seperti mudahnya api memakan kayu kering
sehingga tidak tinggal apa-apa lagi.
Diriwayatkan oleh Abu Ummah al-Bahili, di akhirat seorang terkejut besar
apabila melihat cacatan amalan kebaikan yang tidak pernah dilakukannya
didunia. Maka, dia berkata kepada Allah "Wahai Tuhan ku, dari manakah
datangnya kebaikan yang banyak ini, sedangkan aku tidak pernah
melakukannya". Maka Allah menjawab : "Semua itu kebaikan (pahala) orang
yang mengumpat engkau tanpa engkau ketahui".
Sebaliknya, jika pahala orang yang mengumpat tidak ada lagi untuk diberikan
kepada orang yang diumpat, maka dosa orang yang diumpat akan dipindahkan
kepada orang yang mengumpat. Inilah dikatakan orang muflis diakhirat nanti.
Memandangkan betapa buruknya sifat mengumpat, kita wajib berusaha
mengelakkan diri daripada melakukannya.
Oleh itu perbanyakkanlah zikir supaya dapat menghindarkan diri daripada
mengumpat.
Majlis Graduasi
|

Colorful Light Burst Text In Photoshop
|

Let's get started!
Step 1: Open A New Photoshop Document
Open a new document in Photoshop by going up to the File menu and choosing New..., or by using the keyboard shortcut, Ctrl+N(Win) / Command+N (Mac
). You can choose your own width and height for your document, but if you want to follow along, I chose the 640x480 size from the list of available presets to keep things simple. I've also left my Resolution value set to its default of 72 pixels/inch. Since I'm creating this text effect for the web, it makes no difference what I set the resolution value to, so the default value is fine:

Create a new document in Photoshop. To follow along, use the "640x480" preset size.
Step 2: Add Your Text
With your new blank document open, grab the Type tool from the Tools palette or by pressing T on your keyboard. Make sure blackis selected as your foreground color. If it isn't, just press D on your keyboard to reset it to black. Choose your font in the Options Bar at the top of the screen. Thick, heavy fonts work best for this effect. Then, go ahead and enter your text. I'm going to use "Impact", and I'll type the words "LIGHT BURST":

Choose a thick, heavy font, and with black as your foreground color, enter your text.
Step 3: Resize Your Text With Free Transform
With your text layer selected in the Layers palette, use the keyboard shortcut Ctrl+T (Win) / Command+T (Mac) to bring up theFree Transform box and handles around your text. Hold down Shift+Alt (Win) / Shift+Option (Mac) and drag out any of the corner handles to make your text larger and fill up more of the document area. Holding Shift constrains the text proportions, and holding Alt/Option resizes the text from the center:

Resize the text with Photoshop's "Free Transform" command.
Make sure to still leave plenty of room around the text for our light burst effect. Press Enter (Win) / Return (Mac) when you're done to accept the transformation.
Step 4: Rasterize Your Text
We're going to be applying several filters to our text, but Photoshop doesn't allow us to do that without first rasterizing it, which simply means to convert it into pixels. So again with the text layer selected, go up to the Layer menu at the top of the screen, chooseRasterize, and then choose Type. This will convert our text into pixels. It will still look the same in the document window, but in the Layers palette, the Type layer will now be a regular layer:

After rasterizing the text, the Type layer in the Layers palette becomes a normal layer.
Step 5: Add A Selection Around Your Text And Save It
Ctrl-click (Win) / Command-click (Mac ) directly on the thumbnail preview area of the text layer in the Layers palette to quickly load a selection around your text:

"Ctrl-click" (Win) / "Command-click" (Mac) directly on the text thumbnail in the Layers palette.
Your text will now have a selection around it:

The text is now selected.
With the text selected, go up to the Select menu at the top of the screen and choose Save Selection. When the Save Selectiondialog box appears, just click OK. There's no need to name it or make any changes to the options.
Once you've saved your selection, press Ctrl+D (Win) / Command+D (Mac) to deselect your text.
Switch over to your Channels palette for a moment (it's grouped in beside the Layers palette) and you'll see your selection saved as a new channel named "Alpha 1" at the very bottom. We'll be coming back here a bit later to load our selection again:

Step 6: Use "Fill" To Fill Your Text Layer With White And Set The Blend Mode To "Multiply"
Switch back to your Layers palette once again, and with the text layer selected, go up to the Edit menu at the top of the screen and choose Fill, or press Shift+F5 on your keyboard to quickly bring up Photoshop's Fill dialog box. When the dialog box appears, set the Contents to White and change the Blending Mode to Multiply:

Photoshop's "Fill" dialog box".
Click OK when you're done. Nothing will seem to have happened in your document window, but if you look at your text layer's thumbnail in the Layers palette, you'll see that all of the empty space around the text has now been filled with white, while leaving the text black thanks to that "Multiply" mode.
Step 7: Apply The Gaussian Blur Filter To The Text
Go up to the Filter menu at the top of the screen, choose Blur, and then choose Gaussian Blur. When the Gaussian Blur dialog box appears, enter a Radius value of about 4 pixels and click OK to apply a slight blurring to the text:

Apply the Gaussian Blur filter to the text.
Here's the text after applying Gaussian Blur:

The text is now blurred slightly.
Step 8: Apply The "Solarize" Filter To The Text
With the text layer still selected, go back up to the Filter menu and this time choose Stylize, and then choose Solarize. This will turn the document black, and your text will appear as a white stroke:

The image after applying the Solarize filter.
Step 9: Lighten The Text With Levels
The text is looking a little dark, so let's lighten it. Use the keyboard shortcut Ctrl+L (Win) / Command+L (Mac ) to bring up Photoshop's Levels command, and drag the white point slider on the right in towards the left until you reach the right edge of the histogram:

With the Levels dialog box open, grab the white point slider on the right and drag it to the right edge of the histogram to brighten the text.
Click OK. The text will now appear much brighter:

The text is now much brighter after applying Levels.
Step 10: Make A Copy Of The Text Layer
We need to make a copy of the text layer at this point, so to do that, with the text layer selected, use the keyboard shortcut Ctrl+J(Win) / Command+J (Mac), which will add a copy of the layer above it in the Layers palette:

The Layers palette now showing both the text layer and the copy above it.
Make sure the copy of the text layer is selected because all of these next steps are to be done on the copy. We won't be touching the original again until near the end.
Step 11: Apply The "Polar Coordinates" Filter To The Text
Go back up to the Filter menu, and this time choose Distort, and then Polar Coordinates. We're going to send our text to the North Pole. Alright, no we're not. What we are going to do is make it look very strange. When the Polar Coordinates dialog box appears, select the Polar To Rectangular option at the very bottom and then click OK:
Step 19: Apply The "Polar Coordinates" Filter Again
Go back up to the Filter menu again, choose Distort, and then choose Polar Coordinates. This time choose the Rectangular to Polar option and click OK:
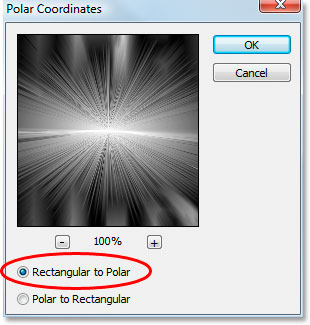
Apply "Polar Coordinates" again, this time choosing "Rectangular to Polar".
Your image should now look something like this:

The image after applying the "Polar Coordinates" filter a second time.
Step 20: Set The Layer Blend Mode To "Screen"
Go up to the blend mode options in the top left of the Layers palette and change the blend mode of the text copy layer from "Normal" to Screen by clicking on the down-pointing arrow and selecting "Screen" from the list:

Change the blend mode of the text copy layer to Screen.
This reveals the original text layer beneath it:

The original text layer is now visible as well.

Photoshop's "Polar Coordinates" dialog box.
Your text will now look very strange indeed:

The text after applying the "Polar Coordinates" filter.
Step 12: Rotate The Canvas 90 Degrees Clockwise
Go up to the Image menu at the top of the screen, select Rotate Canvas, and then choose 90° CW to rotate the canvas 90 degrees clockwise:

Rotate the canvas 90 degrees clockwise.
Step 13: Invert The Image
Use the keyboard shortcut Ctrl+I (Win) / Command+I (Mac ) to invert the image, so black becomes white and white becomes black:

Step 14: Apply The "Wind" Filter Three Times
Go back up to the Filter menu once again, choose Stylize, and then choose Wind. When the Wind filter's dialog box appears, make sure Method is set to Wind and Direction is set to From the Right:
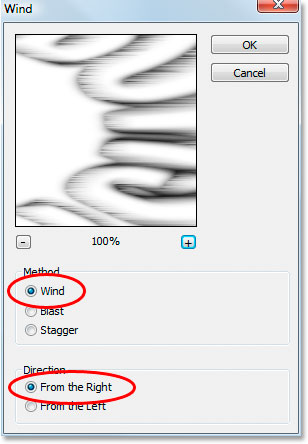
Photoshop's "Wind" filter.
Click OK to apply the Wind filter once. Then press the keyboard shortcut Ctrl+F (Win) / Command+F (Mac ) twice to apply the same filter two more times.
Step 15: Invert The Image Again
Press Ctrl+I (Win) / Command+I (Mac) to invert the image once again:

Invert the image once again using "Ctrl+I" (Win) / "Command+I" (Mac).
Step 16: Apply The "Wind" Filter Three More Times
With the image inverted, press the keyboard shortcut Ctrl+F (Win) / Command+F (Mac) three more times to apply the filter to the image three more times:

Apply the "Wind" filter to the image three more times.
Step 17: Brighten The Image Again With Levels
We need to brighten the image again using Levels, but this time, we'll let Photoshop do the work for us by using Auto Levels. To do that, press Shift+Ctrl+L (Win) / Shift+Command+L (Mac) to apply the Auto Levels command to the image, which will brighten it up:

Apply the "Auto Levels" command to brighten the image.
Step 18: Rotate The Canvas 90 Degrees Counterclockwise
Go back up to the Image menu at this point, choose Rotate Canvas once again, and this time choose 90° CCW to rotate the canvas back to the way it was originally:

Rotate the canvas 90° CCW.
Invert the image with "Ctrl+I" (Win) / "Command+I" (Mac).
Step 21: Apply A Gradient Fill Layer To Add Color
Click on the New Fill Or Adjustment Layer icon at the bottom of the Layers palette:
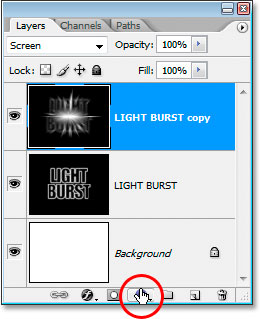
Click the "New Fill Or Adjustment Layer icon.
And select "Gradient" from the list:

Select a Gradient fill layer.
When the Gradient Fill dialog box pops up, click inside the gradient preview area at the top:

Click inside the gradient preview area.
This will bring up the Gradient Editor dialog box. Click on the gradient swatch in the top left, the black to white gradient first, and this will make sure that both colors on either side of the gradient have their opacity set to 100%:

Select the black to white gradient swatch in the top left to make sure both colors are set to 100% opacity first.
Then set your gradient colors to whatever you like. I've set the color on the left to a reddish-orange, and the color on the right to a yellowish-orange:

Set your gradient colors.
Exit out of the gradient dialog boxes once you've chosen your colors.
Step 22: Change The Blend Mode Of The Gradient Fill Layer To "Color"
With the Gradient fill layer selected, go back to the blend mode options in the top left of the Layers palette and change the layer's blend mode to Color:

Change the blend mode of the Gradient fill layer to "Color".
The image is now colorized with the colors from the gradient:

Step 23: Apply A Radial Blur To The Original Text Layer
We're done with the text copy layer at this point. We're going to finish off the last few steps by working on the original text layer, so click on it in the Layers palette to select it. Then go up to the Filter menu, choose Blur, and then choose Radial Blur:
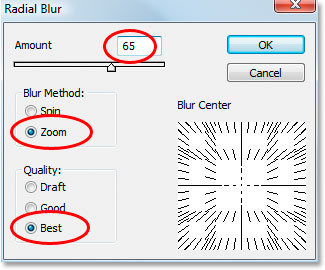
Photoshop's "Radial Blur" dialog box.
Set the Amount to about 65 pixels, the Blur Method to Zoom, and the Quality to Best, as circled above, and then click OK to apply the filter to the original text:

The Radial Blur applied to the image.
Step 24: Load The Saved Text Selection
Only a couple of things left to do. First, switch over to your Channels palette again like we did earlier. We're going to reload that selection we saved. To do that, simply right-click (Win) / Control-click (Mac ) anywhere on the Alpha 1 channel at the very bottom, which will load the selection back into the document window:

Right-click (Win) / Control-click (Mac) anywhere on the "Alpha 1" channel to load the saved text selection.
Switch back to the Layers palette when you're done. The selection is now loaded in the image:

The selection now loaded into the image.
One thing left to do...
Step 25: Fill The Selection With Black
With the original text layer selected in the Layers palette and black still as your foreground color, press Alt+Backspace (Win) /Option-Delete (Mac) to fill the selection with black and finish the effect.
Press Ctrl+D (Win) / Command+D (Mac) to remove the selection, and you're done!
After all that, here's the final "light burst" text effect:

The final "Light Burst" effect.
http://www.photoshopessentials.com/photoshop-text/text-effects/light-burst
Subscribe to:
Posts (Atom)